Thursday, 30 March 2017

simple chat application using firebase

hai friends in this tutorial we will implement simple chat application using firebase in very simple way

features of this application :

  • Login functionality
  • Register functionality
  • Chatting functionality
  • Group chat functionality

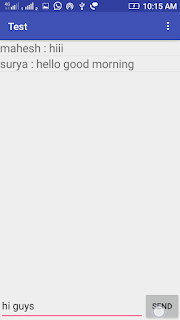
final output :

chat page

Lets start our work

  • create a new android project in android studio
  • setup the firebase with our android project (if you don't know about please see the below video)


  • add the following dependencies in our project under project structure build.gradle(Module: app) file in module section
 compile 'com.google.firebase:firebase-database:10.0.0'   
 compile 'com.google.firebase:firebase-auth:10.0.0'   
 compile 'com.firebaseui:firebase-ui-database:0.6.2'  

create User Interface for our Application

  • make our activity_main.xml file like below  (under res/layout/activity_main.xml)

activity_main.xml

 <?xml version="1.0" encoding="utf-8"?>  
 <LinearLayout xmlns:android="http://schemas.android.com/apk/res/android"  
   android:id="@+id/activity_main"  
   android:layout_width="match_parent"  
   android:orientation="vertical"  
   android:layout_height="match_parent"  
   >  
   <ListView  
     android:layout_width="match_parent"  
     android:layout_height="0dp"  
     android:id="@+id/listview"  
     android:layout_weight="0.9">  
   </ListView>  
   <LinearLayout  
     android:orientation="horizontal"  
     android:layout_width="match_parent"  
     android:layout_weight="0.1"  
     android:layout_height="0dp"  
     >  
   <EditText  
     android:layout_width="0dp"  
     android:layout_height="match_parent"  
     android:id="@+id/edittext"  
     android:layout_weight="0.8"/>  
     <Button  
       android:layout_width="0dp"  
       android:layout_height="match_parent"  
       android:text="Send"  
       android:onClick="send"  
       android:layout_weight="0.2"  
       />  
   </LinearLayout>  
 </LinearLayout>  

Creating LoginActivity 

  • right click on the package (example: com.example.mahesh.test)
  • then New->Activity->Empty Activity
  • give name as "LoginActivity"
make our activity_login.xml file like below  (under res/layout/activity_login.xml) 

activity_login.xml

 <?xml version="1.0" encoding="utf-8"?>  
 <RelativeLayout xmlns:android="http://schemas.android.com/apk/res/android"  
   xmlns:tools="http://schemas.android.com/tools"  
   android:id="@+id/activity_login"  
   android:layout_width="match_parent"  
   android:layout_height="match_parent"  
   android:paddingBottom="@dimen/activity_vertical_margin"  
   android:paddingLeft="@dimen/activity_horizontal_margin"  
   android:paddingRight="@dimen/activity_horizontal_margin"  
   android:paddingTop="@dimen/activity_vertical_margin"  
   tools:context="com.example.mahesh.test.LoginActivity">  
   <EditText  
     android:layout_width="match_parent"  
     android:layout_height="wrap_content"  
     android:inputType="textPassword"  
     android:ems="10"  
     android:layout_marginTop="34dp"  
     android:id="@+id/password"  
     android:hint="password.."  
     android:layout_below="@+id/email"  
     android:layout_alignParentLeft="true"  
     android:layout_alignParentStart="true"  
      />  
   <Button  
     android:text="Login"  
     android:layout_width="wrap_content"  
     android:layout_height="wrap_content"  
     android:onClick="login"  
     android:layout_marginTop="69dp"  
     android:id="@+id/login"  
     android:layout_below="@+id/password"  
     android:layout_centerHorizontal="true" />  
   <EditText  
     android:layout_width="match_parent"  
     android:layout_height="wrap_content"  
     android:inputType="textPersonName"  
     android:hint="email.."  
     android:ems="10"  
     android:layout_marginTop="109dp"  
     android:id="@+id/email"  
     android:layout_alignParentTop="true"  
     android:layout_alignParentLeft="true"  
     android:layout_alignParentStart="true"  
      />  
   <TextView  
     android:text="new user?"  
     android:layout_width="wrap_content"  
     android:layout_height="wrap_content"  
     android:onClick="register"  
     android:id="@+id/newUser"  
     android:layout_below="@+id/button2"  
     android:layout_alignRight="@+id/button2"  
     android:layout_alignEnd="@+id/button2"  
     android:layout_marginTop="37dp" />  
 </RelativeLayout>  

Creating RegisterActivity 

  • right click on the package (example: com.example.mahesh.test)
  • then New->Activity->Empty Activity
  • give name as "RegisterActivity"
make our activity_register.xml file like below  (under res/layout/activity_register.xml)

activity_register.xml

 <?xml version="1.0" encoding="utf-8"?>  
 <RelativeLayout xmlns:android="http://schemas.android.com/apk/res/android"  
   xmlns:tools="http://schemas.android.com/tools"  
   android:id="@+id/activity_register"  
   android:layout_width="match_parent"  
   android:layout_height="match_parent"  
   android:paddingBottom="@dimen/activity_vertical_margin"  
   android:paddingLeft="@dimen/activity_horizontal_margin"  
   android:paddingRight="@dimen/activity_horizontal_margin"  
   android:paddingTop="@dimen/activity_vertical_margin"  
   tools:context="com.example.mahesh.test.RegisterActivity">  
   <EditText  
     android:layout_width="match_parent"  
     android:layout_height="wrap_content"  
     android:inputType="textPersonName"  
     android:hint="email"  
     android:ems="10"  
     android:layout_marginTop="62dp"  
     android:id="@+id/email"  
     android:layout_alignParentTop="true"  
     android:layout_alignParentLeft="true"  
     android:layout_alignParentStart="true" />  
   <EditText  
     android:layout_width="match_parent"  
     android:layout_height="wrap_content"  
     android:inputType="textPersonName"  
     android:hint="name"  
     android:ems="10"  
     android:layout_below="@+id/email"  
     android:layout_alignParentLeft="true"  
     android:layout_alignParentStart="true"  
     android:layout_marginTop="24dp"  
     android:id="@+id/name" />  
   <EditText  
     android:layout_width="match_parent"  
     android:layout_height="wrap_content"  
     android:inputType="textPassword"  
     android:hint="password"  
     android:ems="10"  
     android:layout_marginTop="22dp"  
     android:id="@+id/password"  
     android:layout_below="@+id/name"  
     android:layout_alignParentLeft="true"  
     android:layout_alignParentStart="true" />  
   <Button  
     android:text="Submit"  
     android:layout_width="wrap_content"  
     android:layout_height="wrap_content"  
     android:layout_alignParentBottom="true"  
     android:onClick="submit"  
     android:layout_centerHorizontal="true"  
     android:layout_marginBottom="93dp"  
     android:id="@+id/button3" />  
 </RelativeLayout>  

creating individual_row.xml 

  • right click on layout 
  • new->Layout resource file
  • give name as "individual_row.xml"
make our individual_row.xml file like below  (under res/layout/individual_row.xml)

individual_row.xml

 <?xml version="1.0" encoding="utf-8"?>  
 <LinearLayout xmlns:android="http://schemas.android.com/apk/res/android"  
   android:orientation="vertical" android:layout_width="match_parent"  
   android:layout_height="match_parent">  
   <TextView  
     android:text="TextView"  
     android:layout_width="match_parent"  
     android:textSize="20sp"  
     android:layout_height="wrap_content"  
     android:id="@+id/textView1" />  
 </LinearLayout>  

MainActivity.java

 package com.example.mahesh.test;  
 import android.os.*;  
 import android.support.v7.app.AppCompatActivity;  
 import android.view.Menu;  
 import android.view.MenuItem;  
 import android.view.View;  
 import android.widget.EditText;  
 import android.widget.ListView;  
 import android.widget.TextView;  
 import com.firebase.ui.database.FirebaseListAdapter;  
 import com.google.firebase.auth.FirebaseAuth;  
 import com.google.firebase.database.DataSnapshot;  
 import com.google.firebase.database.DatabaseError;  
 import com.google.firebase.database.DatabaseReference;  
 import com.google.firebase.database.FirebaseDatabase;  
 import com.google.firebase.database.ValueEventListener;  
 import java.util.HashMap;  
 public class MainActivity extends AppCompatActivity {  
   private EditText editText;  
   private DatabaseReference chat_data_ref;  
   private DatabaseReference user_name_ref;  
   private ListView listView;  
   private FirebaseAuth mAuth;  
   private String name="";  
   HashMap<String,String> map;  
   @Override  
   protected void onCreate(Bundle savedInstanceState) {  
     super.onCreate(savedInstanceState);  
     setContentView(R.layout.activity_main);  
     mAuth= FirebaseAuth.getInstance();  
     editText=(EditText)findViewById(R.id.edittext);  
     chat_data_ref= FirebaseDatabase.getInstance().getReference().child("chat_data");  
     user_name_ref=FirebaseDatabase.getInstance().getReference().child("chat_users").child(mAuth.getCurrentUser().getUid()).child("name");  
     listView=(ListView)findViewById(R.id.listview);  
     map=new HashMap<>();  
     user_name_ref.addValueEventListener(new ValueEventListener() {  
       @Override  
       public void onDataChange(DataSnapshot dataSnapshot) {  
         // This method is called once with the initial value and again  
         // whenever data at this location is updated.  
         name=dataSnapshot.getValue().toString();  
       }  
      @Override  
       public void onCancelled(DatabaseError error) {  
         // Failed to read value  
       }  
     });  
     FirebaseListAdapter<Message> adapter=new FirebaseListAdapter<Message>(  
         this,Message.class,R.layout.individual_row,chat_data_ref  
     ) {  
       @Override  
       protected void populateView(View v, Message model, int position) {  
         TextView msg=(TextView)v.findViewById(R.id.textView1);  
         msg.setText(model.getUser_name()+" : "+model.getMessage());  
       }  
     };  
     listView.setAdapter(adapter);  
   }  
   public void send(View view) {  
     chat_data_ref.push().setValue(new Message(editText.getText().toString(),name));//storing actual msg with name of the user  
     editText.setText("");//clear the msg in edittext  
   }  
   @Override  
   public boolean onCreateOptionsMenu(Menu menu) {  
     getMenuInflater().inflate(R.menu.menu,menu);  
     return super.onCreateOptionsMenu(menu);  
   }  
   @Override  
   public boolean onOptionsItemSelected(MenuItem item) {  
     if(item.getItemId()==R.id.logout)  
     {  
       mAuth.signOut();//when the user clicks signout option this will executes  
       finish();  
     }  
     return super.onOptionsItemSelected(item);  
   }  
 }  

LoginActivity.java

 package com.example.mahesh.test;  
 import android.app.ProgressDialog;  
 import android.content.Intent;  
 import android.support.annotation.NonNull;  
 import android.support.v7.app.AppCompatActivity;  
 import android.os.Bundle;  
 import android.util.Log;  
 import android.view.View;  
 import android.widget.EditText;  
 import android.widget.Toast;  
 import com.google.android.gms.tasks.OnCompleteListener;  
 import com.google.android.gms.tasks.Task;  
 import com.google.firebase.auth.AuthResult;  
 import com.google.firebase.auth.FirebaseAuth;  
 import com.google.firebase.auth.FirebaseUser;  
 public class LoginActivity extends AppCompatActivity {  
   private static final String TAG = "LoginActivity";  
   private EditText email,password;  
   private FirebaseAuth mAuth;  
   private FirebaseAuth.AuthStateListener mAuthListener;  
   private ProgressDialog loginDialog;  
   @Override  
   protected void onCreate(Bundle savedInstanceState) {  
     super.onCreate(savedInstanceState);  
     setContentView(R.layout.activity_login);  
     email=(EditText)findViewById(R.id.email);  
     password=(EditText)findViewById(R.id.password);  
     mAuth=FirebaseAuth.getInstance();  
     loginDialog =new ProgressDialog(this);  
     loginDialog.setMessage("Login..");  
     mAuthListener = new FirebaseAuth.AuthStateListener() {  
       @Override  
       public void onAuthStateChanged(@NonNull FirebaseAuth firebaseAuth) {  
         if (firebaseAuth.getCurrentUser() != null) {  
           startActivity(new Intent(LoginActivity.this, MainActivity.class).addFlags(Intent.FLAG_ACTIVITY_CLEAR_TOP | Intent.FLAG_ACTIVITY_NEW_TASK));  
           finish();  
         }  
       }  
     };  
   }  
   @Override  
   public void onStart() {  
     super.onStart();  
     mAuth.addAuthStateListener(mAuthListener);  
   }  
   public void login(View view) {  
     loginDialog.show();  
     mAuth.signInWithEmailAndPassword(email.getText().toString(),password.getText().toString()).addOnCompleteListener(new OnCompleteListener<AuthResult>() {  
       @Override  
       public void onComplete(@NonNull Task<AuthResult> task) {  
         if (!task.isSuccessful()) {  
           loginDialog.dismiss();  
           Toast.makeText(getApplicationContext(), "Authentication failed.",  
               Toast.LENGTH_SHORT).show();  
         }  
         loginDialog.dismiss();  
       }  
     });  
   }  
   public void register(View view) {  
     startActivity(new Intent(LoginActivity.this,RegisterActivity.class));  
     finish();  
   }  
 }  

RegisterActivity.java

 package com.example.mahesh.test;  
 import android.app.ProgressDialog;  
 import android.support.annotation.NonNull;  
 import android.support.v7.app.AppCompatActivity;  
 import android.os.Bundle;  
 import android.view.View;  
 import android.widget.EditText;  
 import android.widget.Toast;  
 import com.google.android.gms.tasks.OnCompleteListener;  
 import com.google.android.gms.tasks.OnSuccessListener;  
 import com.google.android.gms.tasks.Task;  
 import com.google.firebase.auth.AuthResult;  
 import com.google.firebase.auth.FirebaseAuth;  
 import com.google.firebase.database.DatabaseReference;  
 import com.google.firebase.database.FirebaseDatabase;  
 public class RegisterActivity extends AppCompatActivity {  
   private EditText email,name,password;  
   DatabaseReference databaseReference;  
   FirebaseAuth mAuth;  
   private DatabaseReference userIdRef;  
   ProgressDialog registerDialog;  
   @Override  
   protected void onCreate(Bundle savedInstanceState) {  
     super.onCreate(savedInstanceState);  
     setContentView(R.layout.activity_register);  
     email=(EditText)findViewById(R.id.email);  
     name=(EditText)findViewById(R.id.name);  
     password=(EditText)findViewById(R.id.password);  
     databaseReference= FirebaseDatabase.getInstance().getReference().child("chat_users");  
     mAuth=FirebaseAuth.getInstance();  
     registerDialog=new ProgressDialog(this);  
     registerDialog.setMessage("Registering..");  
   }  
   public void submit(View view) {  
     registerDialog.show();  
     mAuth.createUserWithEmailAndPassword(email.getText().toString(),password.getText().toString()).addOnCompleteListener(this, new OnCompleteListener<AuthResult>() {  
       @Override  
       public void onComplete(@NonNull Task<AuthResult> task) {  
         if(task.isComplete())  
         {  
           registerDialog.dismiss();  
           Toast.makeText(getApplicationContext(),"Registered successfully",Toast.LENGTH_SHORT).show();  
           userIdRef=databaseReference.child(mAuth.getCurrentUser().getUid());  
           userIdRef.child("name").setValue(name.getText().toString());  
           finish();  
         }  
         registerDialog.dismiss();  
       }  
     });  
   }  
 }  

Message.java

 package com.example.mahesh.test;  
 /**  
  * Created by uma maesh on 29-03-17.  
  */  
 public class Message {  
   private String message,user_name;  
   public String getMessage() {  
     return message;  
   }  
   public void setMessage(String message) {  
     this.message = message;  
   }  
   public String getUser_name() {  
     return user_name;  
   }  
   public void setUser_name(String user_name) {  
     this.user_name = user_name;  
   }  
   public Message() {  
   }  
   public Message(String message, String user_name) {  
     this.message = message;  
     this.user_name = user_name;  
   }  
 }  

 Creating new menu file

  • right click on res directory(app/res)
  • new->Android resource directory
  • then give directory name as menu
  • change the resource type as "Menu"
  • right click on "Menu" directory 
  • new->Menu resource file
  • give name as "menu.xml"
make that menu.xml file as below(res/menu/menu.xml)

menu.xml

 <?xml version="1.0" encoding="utf-8"?>  
 <menu xmlns:android="http://schemas.android.com/apk/res/android">  
 <item android:title="logout" android:id="@+id/logout"></item>  
 </menu>  

  • our AndroidManifest.xml file like below 

AndroidManifest.xml

 <?xml version="1.0" encoding="utf-8"?>  
 <manifest xmlns:android="http://schemas.android.com/apk/res/android"  
   package="com.example.mahesh.test">  
   <application  
     android:allowBackup="true"  
     android:icon="@mipmap/ic_launcher"  
     android:label="@string/app_name"  
     android:supportsRtl="true"  
     android:theme="@style/AppTheme">  
     <activity android:name=".MainActivity"></activity>  
     <activity android:name=".LoginActivity">  
       <intent-filter>  
         <action android:name="android.intent.action.MAIN" />  
         <category android:name="android.intent.category.LAUNCHER" />  
       </intent-filter>  
     </activity>  
     <activity android:name=".RegisterActivity"></activity>  
   </application>  
 </manifest>  

Thursday, 16 March 2017

Registration functionality using firebase authentication service

Hai friends in this tutorial we will learn how to implement registration system using firebase authentication service,so we will store the registration details like name,mail id ,and password into firebase database

Lets start our work

  • create a new android project in android studio
  • setup the firebase with our android project (if u don't know about please see the below video)


  • add the following dependency in our android project under project structure build.gradle(Module: app) file in module section
 compile 'com.google.firebase:firebase-database:10.0.0'  
 compile 'com.google.firebase:firebase-auth:10.0.0'  
  • then click sync now button (top right side of the gradle file)

uses of above dependency

  • firebase database dependency used to uses the database feature of firebase 
  • firebase database dependency used to uses the authentication feature of firebase 

create User Interface for our Application

  • make our activity_main.xml file to below  

activity_main.xml

 <?xml version="1.0" encoding="utf-8"?>  
 <RelativeLayout xmlns:android="http://schemas.android.com/apk/res/android"  
   android:id="@+id/activity_main"  
   android:layout_width="match_parent"  
   android:layout_height="match_parent"  
   >  
   <EditText  
     android:layout_width="match_parent"  
     android:layout_height="wrap_content"  
     android:inputType="textPersonName"  
     android:hint="name"  
     android:ems="10"  
     android:layout_marginTop="115dp"  
     android:id="@+id/name"  
     android:layout_alignParentTop="true"  
     android:layout_alignParentLeft="true"  
     android:layout_alignParentStart="true" />  
   <EditText  
     android:layout_width="match_parent"  
     android:layout_height="wrap_content"  
     android:inputType="textPersonName"  
     android:hint="password"  
     android:ems="10"  
     android:id="@+id/password"  
     android:layout_centerVertical="true"  
     android:layout_alignParentLeft="true"  
     android:layout_alignParentStart="true" />  
   <Button  
     android:text="Register"
     android:onClick="register"  
     android:layout_width="wrap_content"  
     android:layout_height="wrap_content"  
     android:layout_alignParentBottom="true"  
     android:layout_centerHorizontal="true"  
     android:layout_marginBottom="88dp"  
     android:id="@+id/button2" />  
   <EditText  
     android:layout_width="match_parent"  
     android:layout_height="wrap_content"  
     android:inputType="textPersonName"  
     android:hint="email"  
     android:ems="10"  
     android:layout_marginTop="22dp"  
     android:id="@+id/email"  
     android:layout_below="@+id/name"  
     android:layout_alignParentLeft="true"  
     android:layout_alignParentStart="true" />  
 </RelativeLayout>  
  • finally we get user interface like this

  • then make the mainActivity look like this

MainActivity.java

 package com.example.mahesh.test;  
 import android.app.ProgressDialog;  
 import android.os.Bundle;  
 import android.support.annotation.NonNull;  
 import android.support.v7.app.AppCompatActivity;  
 import android.util.Log;  
 import android.view.View;  
 import android.widget.EditText;  
 import android.widget.TextView;  
 import android.widget.Toast;  
 import com.google.android.gms.tasks.OnCompleteListener;  
 import com.google.android.gms.tasks.Task;  
 import com.google.firebase.auth.AuthResult;  
 import com.google.firebase.auth.FirebaseAuth;  
 import com.google.firebase.auth.FirebaseUser;  
 import com.google.firebase.database.DatabaseReference;  
 import com.google.firebase.database.FirebaseDatabase;  
 public class MainActivity extends AppCompatActivity {  
   private static final String TAG = "MainActivity";  
   private DatabaseReference databaseReference;  
   private FirebaseAuth mAuth;  
   private FirebaseAuth.AuthStateListener mAuthListener;  
   private EditText name,email,password;  
   private String userId;  
   private DatabaseReference userIdRef;  
   private ProgressDialog regDialog;  
   @Override  
   public void onStart() {  
     super.onStart();  
     mAuth.addAuthStateListener(mAuthListener);  
   }  
   @Override  
   protected void onCreate(Bundle savedInstanceState) {  
     super.onCreate(savedInstanceState);  
     setContentView(R.layout.activity_main);  
     name=(EditText)findViewById(R.id.name);  
     email=(EditText)findViewById(R.id.email);  
     password=(EditText)findViewById(R.id.password);  
     regDialog=new ProgressDialog(this);  
     regDialog.setMessage("Registering...");  
     databaseReference= FirebaseDatabase.getInstance().getReference().child("Users");  
     mAuth = FirebaseAuth.getInstance();  
     mAuthListener = new FirebaseAuth.AuthStateListener() {  
       @Override  
       public void onAuthStateChanged(@NonNull FirebaseAuth firebaseAuth) {  
         FirebaseUser user = firebaseAuth.getCurrentUser();  
         if (user != null) {  
           // User is signed in  
           userId=user.getUid();  
           Toast.makeText(MainActivity.this, "Signed In", Toast.LENGTH_SHORT).show();  
         } else {  
           // User is signed out  
           Toast.makeText(MainActivity.this, "Signed out", Toast.LENGTH_SHORT).show();  
         }  
         // ...  
       }  
     };  
 }  
   public void register(View view) {  
     regDialog.show();  
     mAuth.createUserWithEmailAndPassword(email.getText().toString(), password.getText().toString())  
         .addOnCompleteListener(this, new OnCompleteListener<AuthResult>() {  
           @Override  
           public void onComplete(@NonNull Task<AuthResult> task) {  
             if(task.isComplete())  
             {  
               regDialog.dismiss();  
               Toast.makeText(getApplicationContext(),"Registered successfully",Toast.LENGTH_SHORT).show();  
               userIdRef=databaseReference.child(userId);  
               userIdRef.child("name").setValue(name.getText().toString());  
             }  
             regDialog.dismiss();  
           }  
         });  
   }  
 }  
  • you need to enable sign-in providers before working with Firebase Authentication system

to enable sign-in providers please follow below steps

  • click here 
  • it will automatically redirects to firebase console page, there you will find your firebase projects
  • then select your project and click Authentication Tab from the left side bar
  • then click Sign-in Method under Authentication like this

  • it will shows Email/Password disabled defaultly like above
  • then you have to enable that option by clicking
  • then only it will works 

Run our Application

  • Now click run button for testing our application
  • you should get screen like this 
  • now enter name,email,password and then click REGISTER button


  • finally you got "Registered Successfully" Toast Message
  • Now check whether our registered Data stored successfully or not 
  • click here 
  • it will automatically redirects to firebase console page, there you will find your firebase projects
  • then select your project and click Authentication Tab from the left side bar
  • it will shows like this(if you did properly)

  • you will see the our registered mail like above but you couldn't find name on authentication i.e(mahesh) because firebase authentication only stores mail & password details(userId also)
  • so we stored name in database section
  • to see the name click database section
  • under Users directory you will get our name(mahesh) like this


please follow the below video in this video you will find step by step process of this example

Thanks for visiting My Blog if you have any doubts please comment below i will come back with better solution

Tuesday, 14 March 2017

Firebase Real time database with ListView

hai friends in this tutorial we will learn how to work with firebase listview ,this is used to display the data of Firebase Realtime Database by rows manner,
so before you work with this example you must know the following things 
  • what is the firebase 
  • why we need to use firebase
  • what is tha advanatges of firebase
if you don't know about the above things Firebase setup video


Lets start our work

  • creating a new android project
  1. I just created a new android project(i.e ListviewTest)
  2. In this project we will retrieve the data from Firebase Realtime Database and displays into listview 
  3. so now we have to setup our android app to firebase project(if you don't know about please see the below video )


  • add the following dependency in our project under project structure build.gradle(Module: app) file in module section
 compile 'com.google.firebase:firebase-database:9.8.0'  

uses of above dependency

  • firebase database dependency used to uses the database feature of firebase 

create User Interface for our Application

  • make our activity_main.xml file to below  

activity_main.xml

 <?xml version="1.0" encoding="utf-8"?>  
 <RelativeLayout xmlns:android="http://schemas.android.com/apk/res/android"  
   xmlns:tools="http://schemas.android.com/tools"  
   android:id="@+id/activity_main2"  
   android:layout_width="match_parent"  
   android:layout_height="match_parent"  
   android:paddingBottom="@dimen/activity_vertical_margin"  
   android:paddingLeft="@dimen/activity_horizontal_margin"  
   android:paddingRight="@dimen/activity_horizontal_margin"  
   android:paddingTop="@dimen/activity_vertical_margin"  
   tools:context="com.example.mahesh.firebasesample.Main2Activity">  
   <ListView  
     android:layout_width="match_parent"  
     android:layout_height="match_parent"  
     android:id="@+id/listview"  
     android:layout_alignParentBottom="true"  
     android:layout_alignParentLeft="true"  
     android:layout_alignParentStart="true"  
     android:layout_marginBottom="11dp" />  
 </RelativeLayout>  
  • finally we get user interface like this
ativity_main.xml
  • make the MainActivity.java file like this

MainActivity.java

 package com.example.mahesh.firebasesample;  
 import android.support.v7.app.AppCompatActivity;  
 import android.os.Bundle;  
 import android.widget.ArrayAdapter;  
 import android.widget.ListView;  
 import android.widget.Toast;  
 import com.google.firebase.database.ChildEventListener;  
 import com.google.firebase.database.DataSnapshot;  
 import com.google.firebase.database.DatabaseError;  
 import com.google.firebase.database.DatabaseReference;  
 import com.google.firebase.database.FirebaseDatabase;  
 import com.google.firebase.database.ValueEventListener;  
 import java.util.ArrayList;  
 import java.util.Map;  
 public class Main2Activity extends AppCompatActivity {  
   DatabaseReference dref;  
   ListView listview;  
   ArrayList<String> list=new ArrayList<>();  
   @Override  
   protected void onCreate(Bundle savedInstanceState) {  
     super.onCreate(savedInstanceState);  
     setContentView(R.layout.activity_main);  
     listview=(ListView)findViewById(R.id.listview);  
     final ArrayAdapter<String> adapter=new ArrayAdapter<String>(this,android.R.layout.simple_dropdown_item_1line,list);  
     listview.setAdapter(adapter);  
     dref=FirebaseDatabase.getInstance().getReference();  
     dref.addChildEventListener(new ChildEventListener() {  
       @Override  
       public void onChildAdded(DataSnapshot dataSnapshot, String s) {  
         list.add(dataSnapshot.getValue(String.class));  
         adapter.notifyDataSetChanged();  
       }  
       @Override  
       public void onChildChanged(DataSnapshot dataSnapshot, String s) {  
       }  
       @Override  
       public void onChildRemoved(DataSnapshot dataSnapshot) {  
         list.remove(dataSnapshot.getValue(String.class));  
         adapter.notifyDataSetChanged();  
       }  
       @Override  
       public void onChildMoved(DataSnapshot dataSnapshot, String s) {  
       }  
       @Override  
       public void onCancelled(DatabaseError databaseError) {  
       }  
     });  
   }  
 }  

Thanks for seeing our blog if you have any doubts please comment below i will come with better solution

Sunday, 12 March 2017

How to work with Firebase Recylerview


hai friends in this tutorial we will learn how to use firebase recyclerview ,this is one of the famous and important ui component in android it makes our work easier

target of our application 


Lets start our work

  • create a new android project in android studio
  • setup the firebase with our android project (if u don't know about please see the below video)

  • add the following dependencies in our project under project structure build.gradle(Module: app) file in module section

  1. compile 'com.google.firebase:firebase-database:10.0.0'
  2. compile 'com.firebaseui:firebase-ui-database:0.6.2'
  3. compile 'com.android.support:recyclerview-v7:24.2.1'
  4. compile 'com.android.support:cardview-v7:24.2.1'
  5. compile 'com.squareup.picasso:picasso:2.5.2'


uses of above dependencies

  • firebase database dependency used to uses the database feature of firebase 
  • firebase ui dependency used to working with firebase recyclerview
  • recyclerview dependency used to working with inbuilt recyclerview of android
  • cardview dependency used to working with cardview 
  • picasso dependency used to set the images into imageview from network urls in easier way

create User Interface for our Application

  • make our activity_main.xml file to below  

activity_main.xml

 <?xml version="1.0" encoding="utf-8"?>  
 <RelativeLayout xmlns:android="http://schemas.android.com/apk/res/android"  
   xmlns:tools="http://schemas.android.com/tools"  
   android:id="@+id/activity_main"  
   android:layout_width="match_parent"  
   android:layout_height="match_parent"  
   >  
   <android.support.v7.widget.RecyclerView  
     android:layout_width="match_parent"  
     android:layout_height="match_parent"  
     android:id="@+id/recyclerview">  
   </android.support.v7.widget.RecyclerView>  
 </RelativeLayout>  
  • create another XML file(i.e individual_row.xml) under res/layout directory
  • then make that xml file to look like this

individual_row.xml

 <?xml version="1.0" encoding="utf-8"?>  
 <android.support.v7.widget.CardView xmlns:android="http://schemas.android.com/apk/res/android"  
   android:layout_width="match_parent" android:layout_height="match_parent">  
   <LinearLayout  
     android:layout_width="match_parent"  
     android:orientation="vertical"  
     android:layout_height="wrap_content">  
     <ImageView  
       android:layout_width="match_parent"  
       android:layout_height="wrap_content"  
       android:src="@mipmap/ic_launcher"  
       android:id="@+id/image"/>  
     <TextView  
       android:layout_width="match_parent"  
       android:layout_height="wrap_content"  
       android:text="title"  
       android:id="@+id/title"/>  
     <TextView  
       android:layout_width="match_parent"  
       android:layout_height="wrap_content"  
       android:text="description"  
       android:id="@+id/description"/>  
   </LinearLayout>  
 </android.support.v7.widget.CardView>  
  • finally we will get user interface like this

individual_rowactivity_main


  • some times you will get activity_main show like this due to some android studio errors but it will works fine
  • next we will manually add some data to our database section like below

  • make the MainActivity.java file like this

MainActivity.java

 package com.example.mahesh.test;  
 import android.content.Context;  
 import android.support.v7.app.AppCompatActivity;  
 import android.os.Bundle;  
 import android.support.v7.widget.LinearLayoutManager;  
 import android.support.v7.widget.RecyclerView;  
 import android.view.View;  
 import android.widget.ImageView;  
 import android.widget.TextView;  
 import android.widget.Toast;  
 import com.firebase.ui.database.FirebaseRecyclerAdapter;  
 import com.google.firebase.database.DatabaseReference;  
 import com.google.firebase.database.FirebaseDatabase;  
 import com.squareup.picasso.Picasso;  
 public class MainActivity extends AppCompatActivity {  
   private RecyclerView recyclerView;  
   private DatabaseReference myref;  
   @Override  
   protected void onCreate(Bundle savedInstanceState) {  
     super.onCreate(savedInstanceState);  
     setContentView(R.layout.activity_main);  
     recyclerView=(RecyclerView)findViewById(R.id.recyclerview);  
     recyclerView.setHasFixedSize(true);  
     recyclerView.setLayoutManager(new LinearLayoutManager(this));  
     myref= FirebaseDatabase.getInstance().getReference().child("/blog");  
     FirebaseRecyclerAdapter<Blog,BlogViewHolder> recyclerAdapter=new FirebaseRecyclerAdapter<Blog,BlogViewHolder>(  
         Blog.class,  
         R.layout.individual_row,  
         BlogViewHolder.class,  
         myref  
     ) {  
       @Override  
       protected void populateViewHolder(BlogViewHolder viewHolder, Blog model, int position) {  
         viewHolder.setTitle(model.getTitle());  
         viewHolder.setDescription(model.getDescription());  
         viewHolder.setImage(model.getImage());  
       }  
     };  
   recyclerView.setAdapter(recyclerAdapter);  
   }  
   public static class BlogViewHolder extends RecyclerView.ViewHolder {  
     View mView;  
     TextView textView_title;  
     TextView textView_decription;  
     ImageView imageView;  
     public BlogViewHolder(View itemView) {  
       super(itemView);  
       mView=itemView;  
       textView_title = (TextView)itemView.findViewById(R.id.title);  
       textView_decription = (TextView) itemView.findViewById(R.id.description);  
       imageView=(ImageView)itemView.findViewById(R.id.image);  
     }  
     public void setTitle(String title)  
     {  
       textView_title.setText(title+"");  
     }  
     public void setDescription(String description)  
     {  
       textView_decription.setText(description);  
     }  
     public void setImage(String image)  
     {  
       Picasso.with(mView.getContext())  
           .load(image)  
           .into(imageView);  
     }  
   }  
 }  

  • create another new java file(i.e Blog) under our application package
  • makes that file look like this

Blog.java

 package com.example.mahesh.test;  
 /**  
  * Created by uma maesh on 12-03-17.  
  */  
 public class Blog {  
   private String title,description,image;  
   public Blog() {  
   }  
   public Blog(String title, String description, String image) {  
     this.title = title;  
     this.description = description;  
     this.image = image;  
   }  
   public String getTitle() {  
     return title;  
   }  
   public void setTitle(String title) {  
     this.title = title;  
   }  
   public String getDescription() {  
     return description;  
   }  
   public void setDescription(String description) {  
     this.description = description;  
   }  
   public String getImage() {  
     return image;  
   }  
   public void setImage(String image) {  
     this.image = image;  
   }  
 }  

Note  : if you are not implementing authentication(Login system) for your                           application (like me) you follow the following steps  

  • click here
  • it will automatically redirects to firebase console page, there you will find your firebase projects
  • then select your project and click database section
  • under database section click Rules tab for changing the rules
  • change the your default rules like below
 {  
  "rules": {  
   ".read": "true",  
   ".write": "true"  
  }  
 }  

Thanks for seeing our blog if you have any doubts please comment below i will come with better solution