hai friends in this tutorial we will learn how to use firebase recyclerview ,this is one of the famous and important ui component in android it makes our work easier

target of our application

Lets start our work
- create a new android project in android studio
- setup the firebase with our android project (if u don't know about please see the below video)
- add the following dependencies in our project under project structure build.gradle(Module: app) file in module section
- compile 'com.google.firebase:firebase-database:10.0.0'
- compile 'com.firebaseui:firebase-ui-database:0.6.2'
- compile 'com.android.support:recyclerview-v7:24.2.1'
- compile 'com.android.support:cardview-v7:24.2.1'
- compile 'com.squareup.picasso:picasso:2.5.2'
uses of above dependencies
- firebase database dependency used to uses the database feature of firebase
- firebase ui dependency used to working with firebase recyclerview
- recyclerview dependency used to working with inbuilt recyclerview of android
- cardview dependency used to working with cardview
- picasso dependency used to set the images into imageview from network urls in easier way
create User Interface for our Application
- make our activity_main.xml file to below
activity_main.xml
 <?xml version="1.0" encoding="utf-8"?>
 <RelativeLayout xmlns:android="http://schemas.android.com/apk/res/android"
   xmlns:tools="http://schemas.android.com/tools"
   android:id="@+id/activity_main"
   android:layout_width="match_parent"
   android:layout_height="match_parent"
   >
   <android.support.v7.widget.RecyclerView
     android:layout_width="match_parent"
     android:layout_height="match_parent"
     android:id="@+id/recyclerview">
   </android.support.v7.widget.RecyclerView>
</RelativeLayout> - create another XML file(i.e individual_row.xml) under res/layout directory
- then make that xml file to look like this
individual_row.xml
 <?xml version="1.0" encoding="utf-8"?>
 <android.support.v7.widget.CardView xmlns:android="http://schemas.android.com/apk/res/android"
   android:layout_width="match_parent" android:layout_height="match_parent">
   <LinearLayout
     android:layout_width="match_parent"
     android:orientation="vertical"
     android:layout_height="wrap_content">
     <ImageView
       android:layout_width="match_parent"
       android:layout_height="wrap_content"
       android:src="@mipmap/ic_launcher"
       android:id="@+id/image"/>
     <TextView
       android:layout_width="match_parent"
       android:layout_height="wrap_content"
       android:text="title"
       android:id="@+id/title"/>
     <TextView
       android:layout_width="match_parent"
       android:layout_height="wrap_content"
       android:text="description"
       android:id="@+id/description"/>
   </LinearLayout>
 </android.support.v7.widget.CardView>
- finally we will get user interface like this
 |
 |
| individual_row | activity_main |
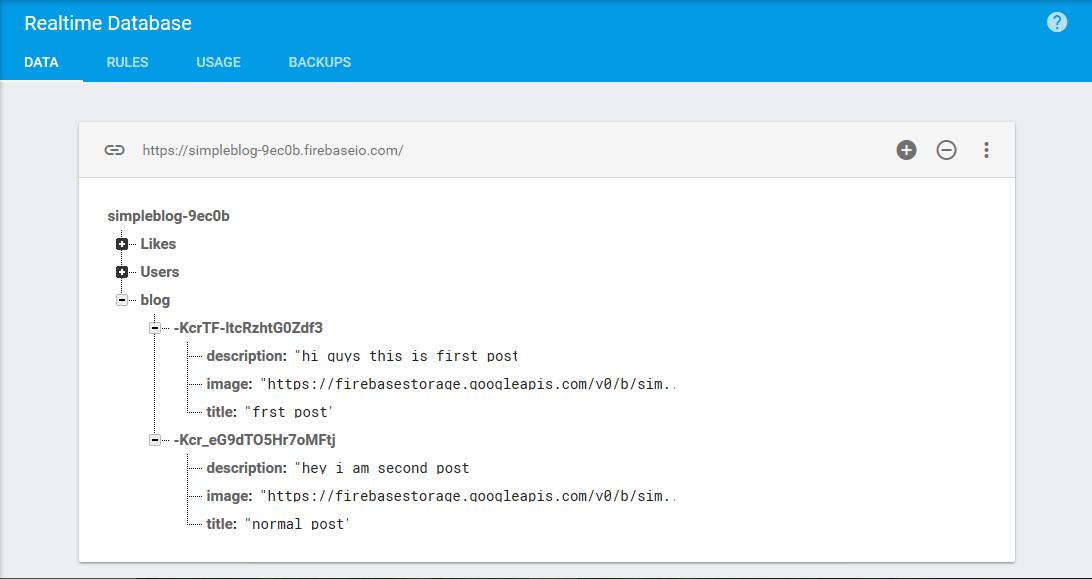
- some times you will get activity_main show like this due to some android studio errors but it will works fine
- next we will manually add some data to our database section like below
- make the MainActivity.java file like this
MainActivity.java
 package com.example.mahesh.test;
 import android.content.Context;
 import android.support.v7.app.AppCompatActivity;
 import android.os.Bundle;
 import android.support.v7.widget.LinearLayoutManager;
 import android.support.v7.widget.RecyclerView;
 import android.view.View;
 import android.widget.ImageView;
 import android.widget.TextView;
 import android.widget.Toast;
 import com.firebase.ui.database.FirebaseRecyclerAdapter;
 import com.google.firebase.database.DatabaseReference;
 import com.google.firebase.database.FirebaseDatabase;
 import com.squareup.picasso.Picasso;
 public class MainActivity extends AppCompatActivity {
   private RecyclerView recyclerView;
   private DatabaseReference myref;
   @Override
   protected void onCreate(Bundle savedInstanceState) {
     super.onCreate(savedInstanceState);
     setContentView(R.layout.activity_main);
     recyclerView=(RecyclerView)findViewById(R.id.recyclerview);
     recyclerView.setHasFixedSize(true);
     recyclerView.setLayoutManager(new LinearLayoutManager(this));
     myref= FirebaseDatabase.getInstance().getReference().child("/blog");
     FirebaseRecyclerAdapter<Blog,BlogViewHolder> recyclerAdapter=new FirebaseRecyclerAdapter<Blog,BlogViewHolder>(
         Blog.class,
         R.layout.individual_row,
         BlogViewHolder.class,
         myref
     ) {
       @Override
       protected void populateViewHolder(BlogViewHolder viewHolder, Blog model, int position) {
         viewHolder.setTitle(model.getTitle());
         viewHolder.setDescription(model.getDescription());
         viewHolder.setImage(model.getImage());
       }
     };
   recyclerView.setAdapter(recyclerAdapter);
   }
   public static class BlogViewHolder extends RecyclerView.ViewHolder {
     View mView;
     TextView textView_title;
     TextView textView_decription;
     ImageView imageView;
     public BlogViewHolder(View itemView) {
       super(itemView);
       mView=itemView;
       textView_title = (TextView)itemView.findViewById(R.id.title);
       textView_decription = (TextView) itemView.findViewById(R.id.description);
       imageView=(ImageView)itemView.findViewById(R.id.image);
     }
     public void setTitle(String title)
     {
       textView_title.setText(title+"");
     }
     public void setDescription(String description)
     {
       textView_decription.setText(description);
     }
     public void setImage(String image)
     {
       Picasso.with(mView.getContext())
           .load(image)
           .into(imageView);
     }
   }
 }
- create another new java file(i.e Blog) under our application package
- makes that file look like this
Blog.java
 package com.example.mahesh.test;
 /**
  * Created by uma maesh on 12-03-17.
  */
 public class Blog {
   private String title,description,image;
   public Blog() {
   }
   public Blog(String title, String description, String image) {
     this.title = title;
     this.description = description;
     this.image = image;
   }
   public String getTitle() {
     return title;
   }
   public void setTitle(String title) {
     this.title = title;
   }
   public String getDescription() {
     return description;
   }
   public void setDescription(String description) {
     this.description = description;
   }
   public String getImage() {
     return image;
   }
   public void setImage(String image) {
     this.image = image;
   }
 }
Note : if you are not implementing authentication(Login system) for your application (like me) you follow the following steps
- click here
- it will automatically redirects to firebase console page, there you will find your firebase projects
- then select your project and click database section
- under database section click Rules tab for changing the rules
- change the your default rules like below
 {
  "rules": {
   ".read": "true",
   ".write": "true"
  }
 }
73 comments
how to implement this code in fragment ????
@prakash shahi for fragment pls see this code ->https://drive.google.com/open?id=0B_6l6OGwOMcQRmEwZW5qRVpWb2s
ok boss goood
Hi ,
The code was extremely helpful but this gives only one group values under one object but how to code if i want to retrieve all objects under Blog.Kindly help me
Please tell me how to add data to firebase data connection, it is some what clear
Hey i am facing problem with your code while i run
it gives me error saying
Error:(35, 34) error: cannot access zzbql
class file for com.google.android.gms.internal.zzbql not found
This is showing all objects inside blog object not single object
Pls see this video https://youtu.be/IYVb42sUh4w
bayya please give me ur contact info....please...understand
i need ur help please
Given so much info in it, These type of articles keeps the users interest in the website, and keep on sharing more ... good luck.
Thanks a lot! You made a new blog entry to answer my question; I really appreciate your time and effort.Best Android Training in chennai|Android Training in chennai with placement | Android Training in velachery
Given so much info in it, These type of articles keeps the users interest in the website, and keep on sharing more ... good luck.
Android Training in chennai with placement | Android Training in velachery
When I tried to implement recyclerview it shows a run time error like this.I did n't find any problem in mycode.My activity close at the time of errorand goes to mainactivity.I am Using fragment.Plz Help...Thanks for adavanced Help
java.lang.NoSuchMethodError: android.os.Binder#execTransact(int,int,int,int)#exact
at de.robv.android.xposed.XposedHelpers.findMethodExact(XposedHelpers.java:339)
at de.robv.android.xposed.XposedHelpers.findAndHookMethod(XposedHelpers.java:176)
at de.robv.android.xposed.XposedHelpers.findAndHookMethod(XposedHelpers.java:251)
at com.phoneinfo.changerpro.hooks.g.a(Unknown Source)
at com.phoneinfo.changerpro.hooks.MainHook.handleLoadPackage(Unknown Source)
at de.robv.android.xposed.IXposedHookLoadPackage$Wrapper.handleLoadPackage(IXposedHookLoadPackage.java:34)
at de.robv.android.xposed.callbacks.XC_LoadPackage.call(XC_LoadPackage.java:61)
at de.robv.android.xposed.callbacks.XCallback.callAll(XCallback.java:106)
at de.robv.android.xposed.XposedBridge$1.beforeHookedMethod(XposedBridge.java:234)
at de.robv.android.xposed.XposedBridge.handleHookedMethod(XposedBridge.java:1550)
at android.app.ActivityThread.handleBindApplication()
at android.app.ActivityThread.access$1600(ActivityThread.java:154)
at android.app.ActivityThread$H.handleMessage(ActivityThread.java:1378)
at android.os.Handler.dispatchMessage(Handler.java:102)
at android.os.Looper.loop(Looper.java:135)
at android.app.ActivityThread.main(ActivityThread.java:5296)
at java.lang.reflect.Method.invoke(Native Method)
at java.lang.reflect.Method.invoke(Method.java:372)
at com.android.internal.os.ZygoteInit$MethodAndArgsCaller.run(ZygoteInit.java:912)
at com.android.internal.os.ZygoteInit.main(ZygoteInit.java:707)
at de.robv.android.xposed.XposedBridge.main(XposedBridge.java:163)
how can get the listview items clickable?
can you help me please
nothing shows to me
how to make the items in recycler view clickable??
Apk build but nothing showing
Internet permissions are okay in manifest file very thing is fine but data isn't showing
Hi, how can we do infinite pagination/scrolling with FirebaseRecyclerAdapter. pls help!! My email mahfuzrubd@gmail.com. Thanks in advance.!
it show only one object one the top of the database
How to add such data in firebase database
What is Error----------------
public class Main2Activity extends AppCompatActivity {
private RecyclerView recyclerView;
private DatabaseReference myref;
@Override
protected void onCreate(Bundle savedInstanceState) {
super.onCreate(savedInstanceState);
setContentView(R.layout.activity_main2);
recyclerView=(RecyclerView)findViewById(R.id.recyclerView);
recyclerView.setHasFixedSize(true);
recyclerView.setLayoutManager(new LinearLayoutManager(this));
myref= FirebaseDatabase.getInstance().getReference().child("mainObject");
FirebaseRecyclerAdapter recyclerAdapter=new FirebaseRecyclerAdapter(
Person.class,
R.layout.list_item,
BlogViewHolder.class,
myref
) {
@Override
protected void populateViewHolder(BlogViewHolder viewHolder, Person model, int position) {
viewHolder.setName(model.getName());
viewHolder.setEmail(model.getEmail());
viewHolder.setImage(model.getImageUri());
}
};
recyclerView.setAdapter(recyclerAdapter);
}
public static class BlogViewHolder extends RecyclerView.ViewHolder {
View mView;
TextView userName;
TextView Email;
ImageView imageView;
public BlogViewHolder(View itemView) {
super(itemView);
mView = itemView;
userName = (TextView) itemView.findViewById(R.id.getName);
Email = (TextView) itemView.findViewById(R.id.getEmail);
imageView = (ImageView) itemView.findViewById(R.id.getImage);
}
public void setName(String name) {
userName.setText(name);
}
public void setEmail(String email) {
Email.setText(email);
}
public void setImage(String imageUri) {
Picasso.with(mView.getContext()).load(imageUri).into(imageView);
}
}
}
Can't convert object of type java.lang.String to type com.sports.mysports.Blog
Brother,
it showing only 1 record, how to fetch all the records from Blog?
how to place search quries?
I am really happy with your blog because your article is very unique and powerful for new reader.
selenium training in chennai
Finding the time and actual effort to create a superb article like this is great thing. I’ll learn many new stuff right here! Good luck for the next post buddy.
selenium training in chennai
All the points you described so beautiful. Every time i read your i blog and i am so surprised that how you can write so well.
Click here:
Angularjs training in chennai
Click here:
angularjs training in bangalore
Click here:
angularjs training in online
Click here:
angularjs training in Annanagar
Well done! Pleasant post! This truly helps me to discover the solutions for my inquiry. Trusting, that you will keep posting articles having heaps of valuable data. You're the best!
Click here:
Microsoft azure training in chennai
Click here:
Microsoft Azure training in online
Existing without the answers to the difficulties you’ve sorted out through this guide is a critical case, as well as the kind which could have badly affected my entire career if I had not discovered your website.Digital Marketing Training in Chennai
Aws Training in Chennai
Selenium Training in Chennai
This is quite educational arrange. It has famous breeding about what I rarity to vouch. Colossal proverb. This trumpet is a famous tone to nab to troths. Congratulations on a career well achieved. This arrange is synchronous s informative impolites festivity to pity. I appreciated what you ok extremely here
python training in OMR
python training in Bangalore
python training in Bangalore
Awesome article. It is so detailed and well formatted that i enjoyed reading it as well as get some new information too.
Data science training in tambaram
Data Science training in anna nagar
Data Science training in chennai
Data science training in Bangalore
Data Science training in marathahalli
Data Science training in btm
I and my friends were going through the nice, helpful tips from the blog then the sudden came up with an awful suspicion I never expressed respect to the website owner for those secrets.
fire and safety courses in chennai
This is a good post. This post give truly quality information. I’m definitely going to look into it. Really very useful tips are provided here. thank you so much. Keep up the good works.
java training in jayanagar | java training in electronic city
java training in chennai | java training in USA
This is most informative and also this post most user friendly and super navigation to all posts... Thank you so much for giving this information to me..
Whoa! I’m enjoying the template/theme of this website. It’s simple, yet effective. A lot of times it’s very hard to get that “perfect balance” between superb usability and visual appeal. I must say you’ve done a very good job with this.
AWS Training in BTM Layout |Best AWS Training in BTM Layout
AWS Training in Marathahalli | Best AWS Training in Marathahalli
Selenium Interview Questions and Answers
AWS Tutorial |Learn Amazon Web Services Tutorials |AWS Tutorial For Beginners
I simply wanted to write down a quick word to say thanks to you for those wonderful tips and hints you are showing on this site.
angularjs online training
apache spark online training
informatica mdm online training
devops online training
aws online training
Awesome! Education is the extreme motivation that open the new doors of data and material. So we always need to study around the things and the new part of educations with that we are not mindful.
Microsoft Azure online training
Selenium online training
Java online training
Java Script online training
Share Point online training
After seeing your article I want to say that the presentation is very good and also a well-written article with some very good information which is very useful for the readers....thanks for sharing it and do share more posts like this.
devops online training
aws online training
data science with python online training
data science online training
rpa online training
Attend The Python Training in Bangalore From ExcelR. Practical Python Training in Bangalore Sessions With Assured Placement Support From Experienced Faculty. ExcelR Offers The Python Training in Bangalore.
Hey, would you mind if I share your blog with my twitter group? There’s a lot of folks that I think would enjoy your content. Please let me know. Thank you.
Java Training in Chennai | J2EE Training in Chennai | Advanced Java Training in Chennai | Core Java Training in Chennai | Java Training institute in Chennai
Good post...
inplant training in chennai
inplant training in chennai
inplant training in chennai for it.php
Australia hosting
mexico web hosting
moldova web hosting
albania web hosting
andorra hosting
australia web hosting
denmark web hosting
This course does not need the pupils to have a specialized degree in the formal education. cursos de ti online
Creative Articles!!!The Brief Explanations about Java are really Fantastic...Gained a lots of idea and knowledge from your Nice works.
Java training in chennai | Java training in annanagar | Java training in omr | Java training in porur | Java training in tambaram | Java training in velachery
thanks a lot guys.keep on update more things tobe like this.nice to read.i really enjoy to see this blog.
Ai & Artificial Intelligence Course in Chennai
PHP Training in Chennai
Ethical Hacking Course in Chennai Blue Prism Training in Chennai
UiPath Training in Chennai
Thanks for taking the time to discuss this, I feel strongly about it and love learning more on this topic.
Java training in Chennai
Java Online training in Chennai
Java Course in Chennai
Best JAVA Training Institutes in Chennai
Java training in Bangalore
Java training in Hyderabad
Java Training in Coimbatore
Java Training
Java Online Training
Irrespective of rankings, this will help in huge traffic generation, on your website, over time and, in turn,will steadily increase the number of potential customers for your products and services.
angular js training in chennai
angular js training in velachery
full stack training in chennai
full stack training in velachery
php training in chennai
php training in velachery
photoshop training in chennai
photoshop training in velachery
Thanks for sharing your informative post on development.Your work is very good and I appreciate you and hoping for some more informational posts.keep writing and sharing.
angular js training in chennai
angular js training in tambaram
full stack training in chennai
full stack training in tambaram
php training in chennai
php training in tambaram
photoshop training in chennai
photoshop training in tambaram
Very nice information, it is valuable and useful to so many people. It gives the beautiful knowledge especially to the technical people.
web designing training in chennai
web designing training in annanagar
digital marketing training in chennai
digital marketing training in annanagar
rpa training in chennai
rpa training in annanagar
tally training in chennai
tally training in annanagar
Amazing article. Your blog helped me to improve myself in many ways thanks for sharing this kind of wonderful informative blogs in live. I have bookmarked more article from this website. Such a nice blog you are providing
Java Training in Chennai
Java Training in Velachery
Java Training in Tambaram
Java Training in Porur
Java Training in Omr
Java Training in Annanagar
Creative Articles!!!The Brief Explanations about Java are really FantasticSoftware Testing Training in Chennai
Software Testing Training in Velachery
Software Testing Training in Tambaram
Software Testing Training in Porur
Software Testing Training in Omr
Software Testing Training in Annanagar
...Gained a lots of idea from your Wonderful works.Keep doing the Same.
when you used then you make recyclerview adatper and bind this adapter into a recycler view . used below code for display firebase all the data and change according your need and make changes.Thanks for Sharing This Article. It was a valuable content. I hope these Commenting lists will help to my website.
Amazon web services Training in chennai
Amazon web services Course in chennai
I feel really happy to have seen your webpage and look forward to so many more entertaining times reading here
Best Selenium Training In Chennai
Best CCNA Training In Chennai
Finish the Selenium Training in Chennai from Infycle Technologies, the best software training institute in Chennai which is providing professional software courses such as Data Science, Artificial Intelligence, Java, Hadoop, Big Data, Android, and iOS Development, Oracle, etc with 100% hands-on practical training. Dial 7502633633 to get more info and a free demo and to grab the certification for having a peak rise in your career.
Infycle Technologies, the No.1 software training institute in Chennai offers the No.1 Selenium course in Chennai for tech professionals, freshers, and students at the best offers. In addition to the Selenium, other in-demand courses such as Python, Big Data, Oracle, Java, Python, Power BI, Digital Marketing, Cyber Security also will be trained with hands-on practical classes. After the completion of training, the trainees will be sent for placement interviews in the top companies. Call 7504633633 to get more info and a free demo.
MMORPG OYUNLAR
Instagram takipçi satin al
Tiktok Jeton Hilesi
Tiktok Jeton Hilesi
Antalya Sac Ekimi
Referans Kimliği Nedir
instagram takipçi satın al
METİN2 PVP SERVERLAR
instagram takipçi satın al
perde modelleri
Mobil onay
vodafone mobil ödeme bozdurma
Nftnasilalinir.com
ankara evden eve nakliyat
TRAFİK SİGORTASİ
dedektör
SİTE KURMAK
aşk kitapları
smm panel
smm panel
iş ilanları
instagram takipçi satın al
Hirdavatciburada.com
Www.beyazesyateknikservisi.com.tr
SERVİS
Tiktok hile indir
ataşehir beko klima servisi
beykoz lg klima servisi
üsküdar lg klima servisi
beykoz alarko carrier klima servisi
üsküdar alarko carrier klima servisi
beykoz daikin klima servisi
üsküdar daikin klima servisi
pendik toshiba klima servisi
pendik beko klima servisi
Good content. You write beautiful things.
vbet
mrbahis
vbet
hacklink
korsan taksi
mrbahis
taksi
sportsbet
hacklink
Good content. You write beautiful things.
vbet
sportsbet
mrbahis
mrbahis
korsan taksi
hacklink
vbet
hacklink
taksi
betmatik
kralbet
betpark
mobil ödeme bahis
tipobet
slot siteleri
kibris bahis siteleri
poker siteleri
bonus veren siteler
XMNT2R
salt likit
salt likit
dr mood likit
big boss likit
dl likit
dark likit
3OQO
TGHBFGNJH
شركة تركيب جبس بورد بجازان
شركة عزل اسطح 0qiqfNjmMi
مكافحة حشرات الاحساء
5V2bCjfgEu
شركة تنظيف بالجبيل
nHZnXsYDJs
شركة تنظيف مكيفات بالدمام
5M5cifJo456
شركة تسلسك مجارى بالدمام
BxdKShd
Emoticon Emoticon